Step-by-Step Guide
Getting Started with Affinity
Webinar Video
Getting Started
Step One
1. Download Affinity
- Go to the official Affinity website → https://www.affinity.studio/download
- Download the Windows or Mac version.
2. Open the installer
- Windows: Find the downloaded .exe file in your Downloads folder
- Double-click it to run the installer
- If prompted, click Yes to allow changes
3. Run the setup wizard
- Accept the license agreement
- Click Install and wait a few minutes
4. Launch Affinity
- Open it from the Start Menu (Windows) or Applications folder (Mac)
- First launch may take a little longer
- Click Edit → Settings
- Select User Interface
- Adjust Background Gray Level by moving the slider
- Under UI Style choose between Dark or Light. (Most prefer Light)
Step Two
- Open your Microsoft Publisher file in Microsoft Publisher
- Remove all background colors, shading, and borders.
- Click File → Save As
- Choose PDF from the Save as type dropdown
- Click Save
- Click File → Open
- Browse to your PDF file and select it
- Click Open
- In the PDF Options dialog, choose:
- Select Load All Pages
- 300 DPI
- Check Favor editable text over fidelity
- Check Group lines of text into text frames
- Replace any fonts that may be missing.
- Click OK to import the PDF
- Click Document Setup from the Context Toolbar.
- In the Document Setup window, you can adjust:
- Document Units (change to inches)
- Page size (8.5 x 11)
- DPI/Resolution (300)
- Orientation (Portrait)
- Color format (CMYK)
- Margins (.38 top, bottom, left, and right.)
Everything else should remain at their defaults.
- In the Master Pages section at the top of the Pages panel, click Add Master (or the + icon).
- Click OK.
To set up guides on a Master Page.
- With the master page active, choose View → Guides
- Set up:
- Columns (35)
- Rows (1)
- Gutters (0)
- Style (Outline)
- (You can also adjust the color of your guides.)
- Margins (.38 inches)
- (You can also adjust the color of your margins.)
- Right click on the Master Page and choose Apply Master to Pages
- Select All Pages
- Click OK
- Go to View → Clip to Canvas.
- Click it to remove the checkmark.
When Clip to Canvas is off:
- You’ll be able to see objects that extend beyond the page.
- The pasteboard (the area around the page) becomes visible.
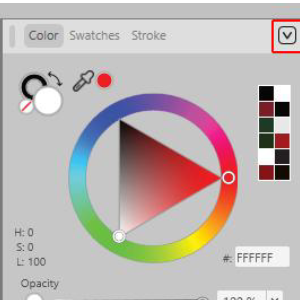 Click on the the Down Arrow on the right side toolbar.
- Select → Panels
- For now, you can toggle Off all the tools except:
o Character
o Paragraph
o Text Frame
o Pages
These are the primary tools you will need, initially.
(You will use many more of these tools as time
goes on. Text Styles, Tables, and Layers, etc.
may be helpful as you get used to using Affinity.
Step Three
You can create a text box (called a Text Frame) by following these steps:
- Select the Frame Text Tool (press “T” on your keyboard) from the Tools panel on the left.
- Move your cursor to the page where you want the text box.
- Click and drag diagonally to draw the size of the text frame.
- Release the mouse button. The text frame is created. Affinity will create a text frame using the previously used specifications from the last text frame made.
- Click inside the frame and begin typing, or paste text into it.
To resize the text box
- Select the Move Tool.
- Click the text frame.
- Drag any of the corner or side handles to resize it.
If the Text Frame panel is not visible
- Go to View → Studio → Text Frame to open the Text Frame panel.
- You can also open View → Studio → Character and View → Studio → Paragraph for additional text formatting controls.
- Click the text box to select it.
- Go to the Text Frame Studio Panel:
- Select the Stroke color.
- In the Stroke panel:
- Increase the Width (for example, 1 pt or 2 pt).
- Choose a line style if desired.
Add a Background Color to a Text Box
- Click the text box to select it.
- Go to the Text Frame Studio Panel:
- Click the Fill icon.
- Choose a color from the color wheel, sliders, or swatches.
The text frame will now have a colored background.
In Affinity you can set 0.2-inch text insets (padding) inside a text box using the Text Frame panel:
- Select the box.
- Go to the Text Frame Studio Panel
- Go to the Insets section.
- Enter 0.2 in for:
- Top
- Bottom
- Left
- Right
- The text will move inward, leaving a 0.2-inch margin between the text and the frame edge.
In Affinity, you can create multiple columns inside a text frame (text box):
- Select the box.
- Go to the Text Frame Studio Panel
- Go to the Columns section.
- Enter the desired number of columns (for example, 2 or 3).
- Adjust the Gutter value to control the spacing between columns. (Entering 0.2 will help you maintain consistent margins inside your text box.)
- Your text will automatically flow from one column to the next within the same text box.
Method 1: Place an Image Anywhere on the Page
- Select your Move Tool and make sure no other text boxes or graphics are highlighted.
- Click File → Place.
- Browse to your image file (example .jpeg, .png, .pdf) and click Open.
- Your cursor will change to show the image.
- Either:
- Click once to place the image at its original size, or
- Click and drag to define the size as you place it.
Method 2: Drag and Drop
- Open File Explorer.
- Drag an image file directly onto your Affinity page.
- Release the mouse button to place it.
Adjusting the Graphic
- Use the corner handles to resize the image.
- Use the Context Toolbar options to replace the image or change how it fits the frame.
In Affinity, you can wrap text around a graphic:
- Select the graphic with the Move Tool.
- Open the Text Wrap panel:
- Click Text → Text Wrap → Show Text Wrap Settings
- In the Text Wrap panel, choose a wrap style:
- No Wrap – text ignores the graphic.
- Square Wrap – text wraps around the graphic’s bounding box.
- Tight Wrap – text follows the shape of the graphic.
- Through – text can flow through transparent areas.
- Adjust the Distance from Text settings (Top, Bottom, Left, Right) to add space between the graphic and the text. Again, using 0.2 will keep your margins consistent.
Step Four
In Affinity you can create a print-ready PDF by following these steps:
1. Export as PDF
- Click File → Export → Export.
- Select PDF (Press Ready) from the list of formats on the left.
- Make sure Area is set to All Pages
- Make sure the Raster DPI is set to 300
2. Export the PDF
- Click Export.
- Choose a save location.
- Save the file.
3. Verify the PDF
Open the PDF and check:
- Images are sharp.
- Fonts display properly.
- No missing graphics or text.
Solve Problems
Troubleshooting
1. Missing Fonts
If the PDF uses fonts that are not installed on your computer, Affinity may substitute different fonts, causing text reflow, line breaks, and layout changes. Affinity will notify you about missing fonts when opening the file.
2. Text Reflow and Formatting Changes
Even when fonts are available, text may not look exactly the same after import. Kerning, tracking, alignment, text wrapping, and paragraph formatting can shift slightly.
3. Effects May Not Translate Correctly
PDF features such as:
- Drop shadows
- Glows
- Transparency effects
- Blend modes
can sometimes import differently or require manual adjustment.
4. Interactive Elements Are Lost
Interactive PDF features (web links) are generally not imported as editable elements.
5. Rasterized Content
Some PDFs contain flattened or rasterized elements. What appears to be editable text or artwork may actually import as a bitmap image, making editing impossible without recreating the content.
6. Layer Structure May Be Missing
PDFs do not always preserve the original layer organization from the source application. Objects may import as numerous grouped elements or a complex layer structure that’s difficult to edit.
7. Color Management Issues
Color profiles may differ between the PDF and your Affinity document. This can result in:
- Slight color shifts
- CMYK/RGB conversion issues
- Preflight warnings for print projects
8. Complex PDFs Can Open Slowly
Large PDFs with many pages, transparency effects, vector objects, or high-resolution images may take significant time to open and can use substantial memory.
9. Imported PDF Cannot Be Saved Back Over the Original
Opening a PDF in Affinity is effectively a one-way import process. Once imported, it must be saved as an Affinity document.
10. Scanned PDFs Are Usually Not Editable
If the PDF was created from a scanner, the pages are often just images. Affinity can open them, but the text won’t be editable unless OCR was performed before the PDF was created.
1. My Studio Panels and Context Tools Are Missing
Press your Tab key — they should reappear.
2. My Pasteboard Is Missing
- Click the View tab.
- Uncheck the Clip To Canvas option.
Become Faster
Common Keyboard Shortcuts in Affinity
- New document: Ctrl + N
- Open: Ctrl + O
- Save: Ctrl + S
- Save As: Ctrl + Shift + S
- Export: Ctrl + Shift + Alt + S
- Print: Ctrl + P
- Close document: Ctrl + W
- Switch documents: Ctrl + Tab
- Undo: Ctrl + Z
- Redo: Ctrl + Shift + Z
- Copy: Ctrl + C
- Paste: Ctrl + V
- Cut: Ctrl + X
- Select All: Ctrl + A
- Deselect: Ctrl + D
- Move Tool: V
- Node Tool: A
- Pen Tool: P
- Text Tool (cycle tools): T
- Rectangle/Ellipse tools: M
- Frame Text tool: F
- Gradient Tool: G
- Transparency Tool: Y
- Color Picker: I
- Zoom Tool: Z
- Hand/View Tool: H
- Group: Ctrl + G
- Ungroup: Ctrl + Shift + G
- Duplicate: Ctrl + J
- Lock: Ctrl + L
- Unlock: Ctrl + Shift + L
- Move to front: Ctrl + ]
- Move to back: Ctrl + [
- Zoom in: Ctrl + +
- Zoom out: Ctrl + –
- Zoom to fit: Ctrl + 0
- 100% view: Ctrl + 1
- Toggle UI: Tab
- Pan canvas: Space (hold)
- Rulers: Ctrl + R
- Grid: Ctrl + ‘
- Guides: Ctrl + ;
- Select all: Ctrl + A
- Invert selection: Ctrl + Shift + I
- Move selection: Arrow keys
- Move 10px: Shift + Arrow keys
- Deselect: Ctrl + D
- Reset selection box: . (period)
- Snap toggle: ; (semicolon)
- Constrain move/transform: Shift + drag
- Bold: Ctrl + B
- Italic: Ctrl + I
- Underline: Ctrl + U
- Align left/center/right: Ctrl + Shift + L/C/R
- Bulleted list: – + Space
- Numbered list: 1. + Space
- Indent: Tab
- Outdent: Shift + Tab
- Add new page: Ctrl + Shift + Page Down
- Next page: Page Down
- Previous page: Page Up
- Add note: Ctrl + Shift + E
- Toggle search: Ctrl + K
- Crop tool: C
- Brush tool: B
- Erase tool: E
- Clone tool: S
- Levels adjustment: Ctrl + L
- Curves: Ctrl + M
- Invert image: Ctrl + I
- Feather selection: Shift + F6