Camino
Formation Walk Through
Creating a New Class
- Using the left menu, navigate to Formation → Classes and click on the Add New Class button in the top right of your screen.
- On this screen, the only information that you are required to fill before clicking “Save” is Class Name, Max Class Size, Start Date, and End Date. All other information is not required on this screen.
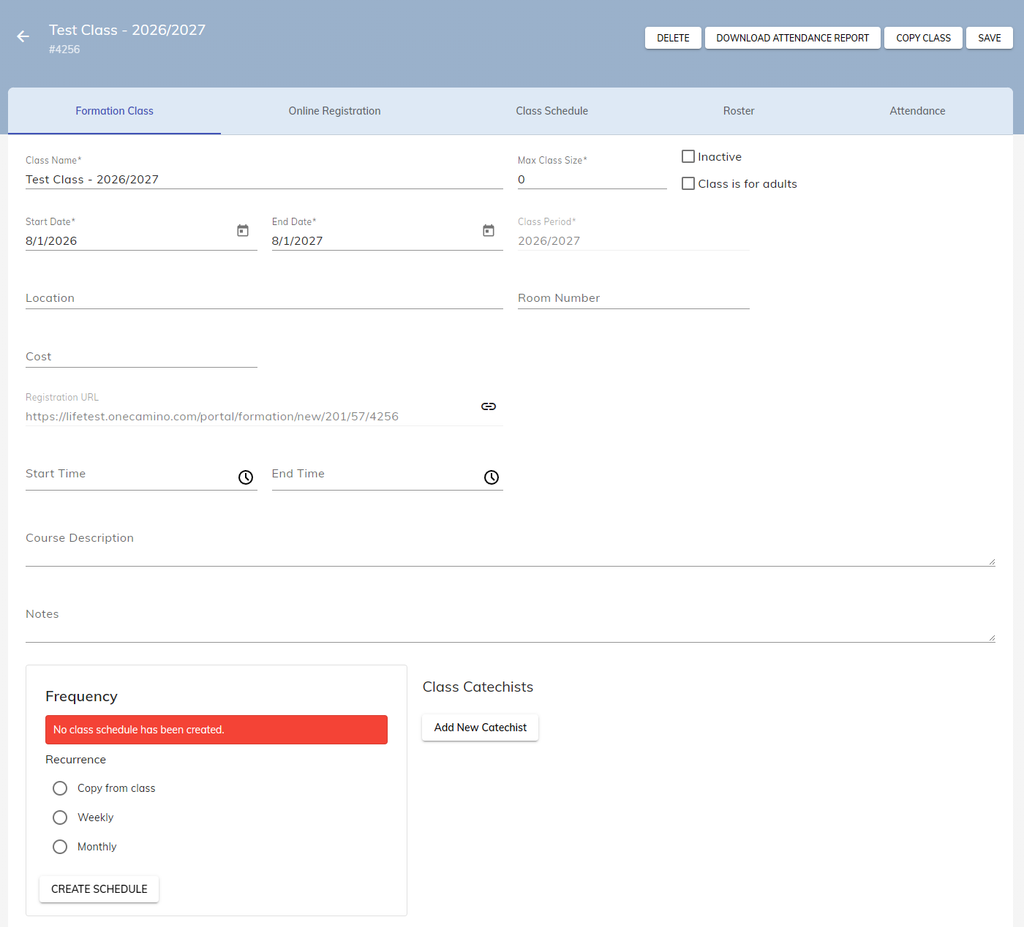
Some things to note here:
- SAVE: Make sure that any changes done on your Formation Class, you press the Save button in the top right of your screen. Changes are NOT automatically saved.
- Copy Class Button: If there is another class that is going to have more or less the same details as the class you are working on, you can press the Copy Class button to create a second instance with all the same information. Just modify the copy as needed.
- This will also copy the online registration form of the original class into the copied version of that class.
- Max Class Size: The max class size is automatically set at zero, which sets the class to no limit. This allows you to register as many students as needed for the class. If you were to set it at 10, as soon as you registered the 10th student, you will no longer be able to add students to that class.
- Class is For Adults: This modifies the required information on the online registration form for the class. This DOES NOT change who can be added into the class.
- Frequency: This allows you to set the schedule for the class. For example, you can set the class to be Weekly, Every Week, on Fridays. This will generate a schedule for you on the Class Schedule tab.
Assigning a Catechist to a Class
When clicking on the Add New Catechist button, you will be able to assign a Catechist to a class. If you are unable to find the Catechist, it is likely that their Catechist checkbox is not filled. Go to that member’s profile page and check the box. Afterwards, you can assign them as a Catechist to a class.
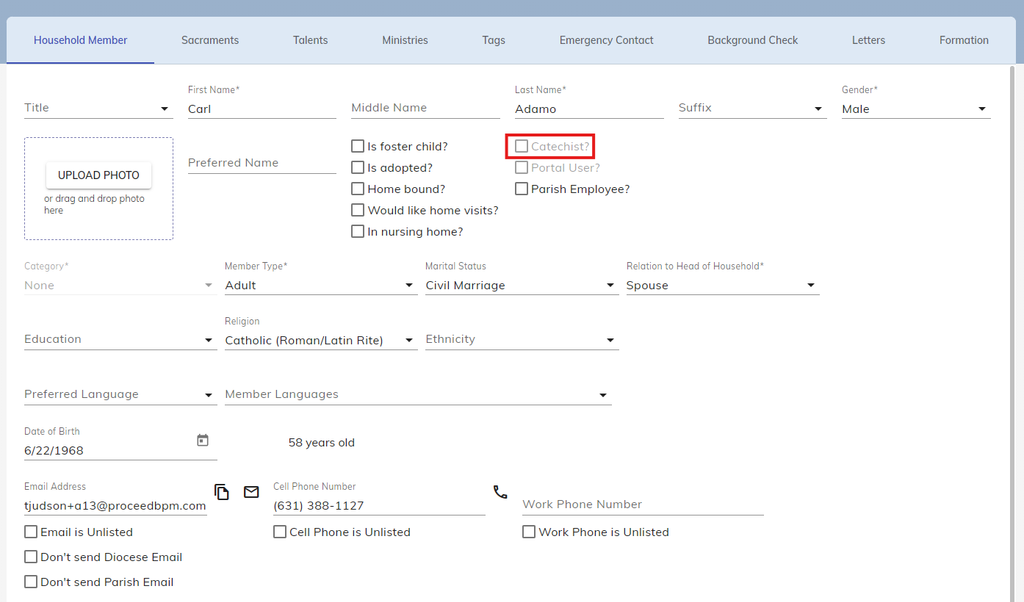
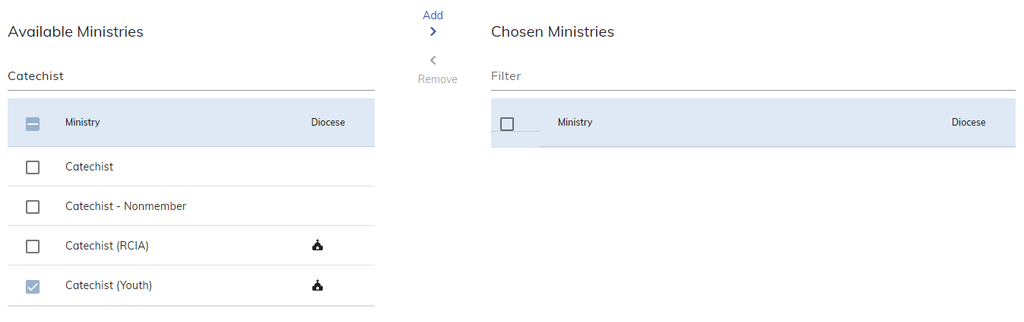
Depending on your Diocese, the Catechist check box may be greyed out and not clickable. For this case, Go to the Ministries tab of the user, search for Catechist, and check the box that contains the correct Ministry, then press the Add button.
IMPORTANT: Make sure to select the option that contains a church symbol as that is a ministry provided to you by your Diocese.
Adding Students to a Class
- Navigate to the Roster tab of the Formation Class
- Underneath the Member Details column, search for the name of the student that you want to add.
- Click on the student’s name
- Scroll to the bottom and click Save and New.
- The student’s name will appear underneath the Members column. Continue adding the rest of your students.
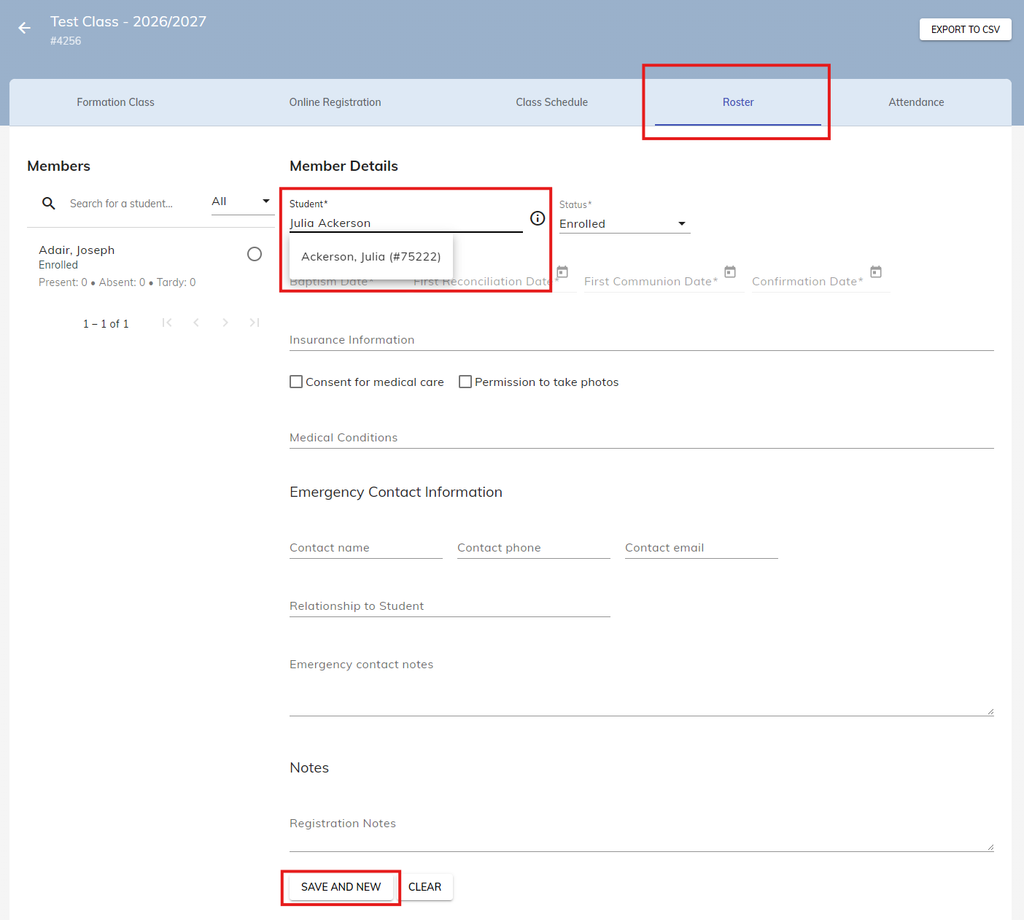
IMPORTANT: If the student you are searching for does not appear, it is possible that the student is does not yet exist in your database. A student must first be added as a member in the database before they can be added to a class.
If want to learn more about adding in households and members, we have an article for that here!
Removing Students: To remove a student from a class, click on their name underneath the Members column, then scroll down and press Delete.
Modifying Student Information: Similar as above, click on the student’s name underneath the Members column. Add or change any information for that student. Then scroll down and press Update.
Online Registrations
To first enable online registrations, go to the Online Registration tab of your Formation class, enable online registrations, then set the Date Range that the online registration form will be open for, as well as its Start Time and End Time. All other checkboxes are optional. Then press Save.
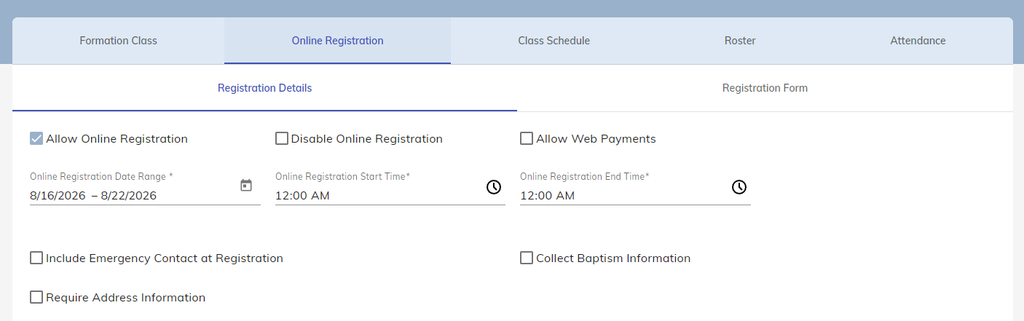
Building and Sharing Your Registration Form
Click on the Registration Form tab to start building your custom form for the class. Now, you can start building your online registration form! Click on the Laptop or Phone Icon on the top middle of your screen to see a preview of the online form.
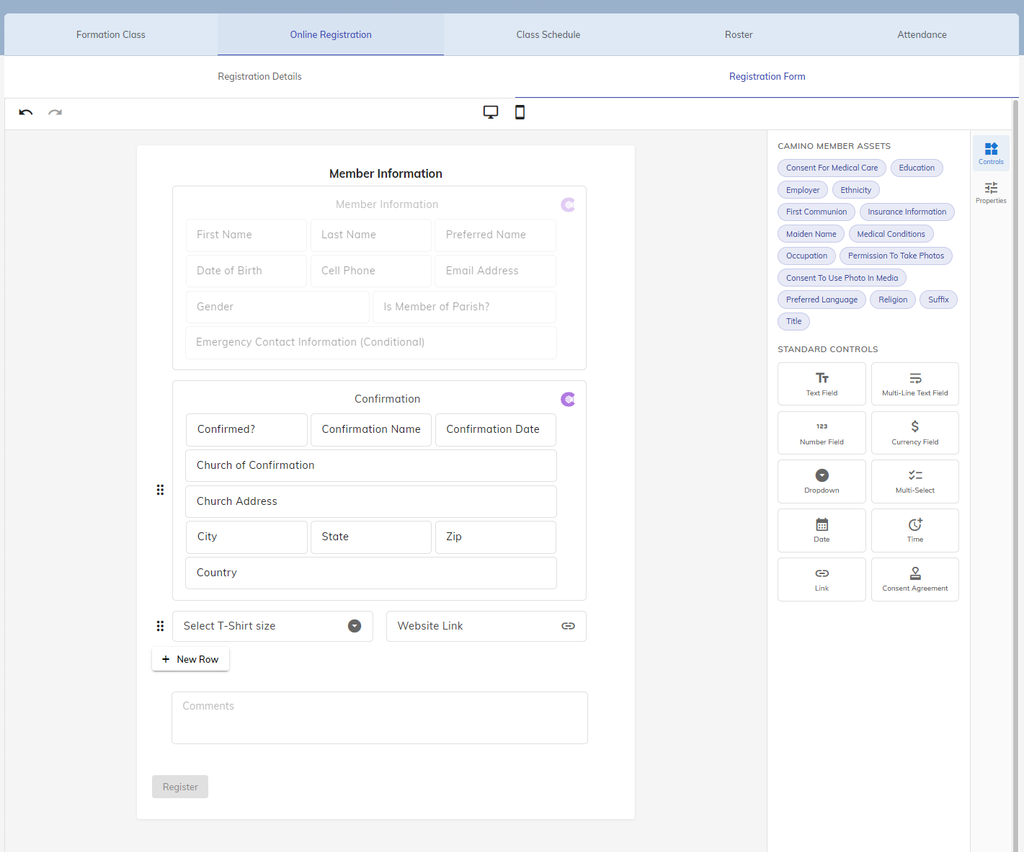
- Adding to the Form: Click and drag any information you want a family to fill out on the right side and onto the form.
- New Row: Click if you need additional rows on the online form.
- Camino Member Assets: These are information that is linked directly to Camino Member data or to Faith Formation Member data.
- Standard Control Assets: If there is other information that you need from families that can not be fulfilled by Camino Member Assets, you may be able to manually create it using one of the controls shown here by clicking and dragging it to an empty row on the form.
- Modify/Delete an Asset: Click on any one of the assets on the form itself to pull up its Properties on the right side of your screen. Make any modifications that you need, or press the Trash Can Icon to delete the asset from the form.
To share the link to the online registration form for you parishioners, copy the link address from one of the boxed options below.

- General Link: The link that allows families to choose and register for any Faith Formation Class is the link in the top left next to Formation Classes.
- Class Specific Link: The link that allows families to register for a specific Formation Class is the link in the URL column of all your classes
Accepting Online Registrations
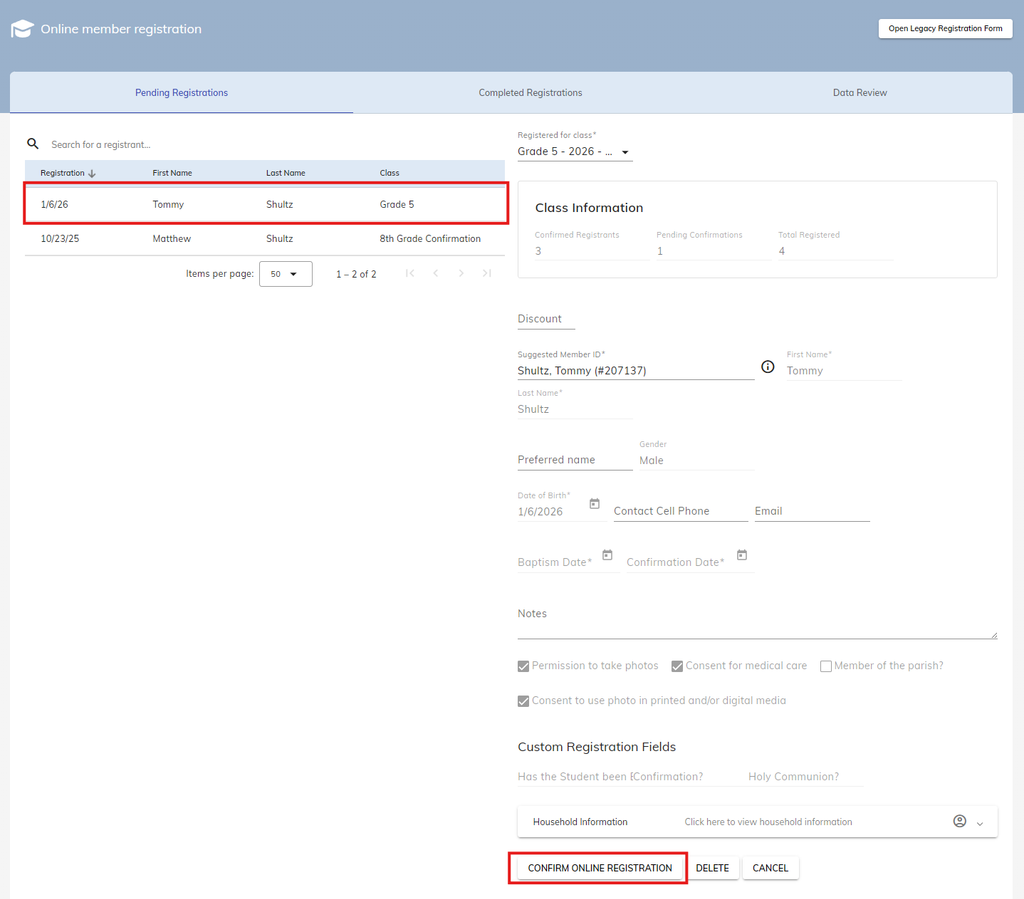
- Using the left menu, navigate to Formation → Online Registration. This will take you to a screen that shows all your online registrants for your Faith Formation Classes.
- Click on the registrant on the table on the left side of your screen.
- Match the online registrant with an existing member on Camino. As before, the registrant must first exist in Camino before they can be registered to a class.
- Ensure the rest of the information is correct.
- Click Confirm Online Registration.